
After our last 2 tutorials on street photography, you’re probably saying to yourself: “Actually it seems that getting started with street photography isn’t all that difficult. So, I’m convinced. This time I’m going to do it! »
And for that, the team from Manfrotto Imagine More and I can only say, “Excellent! You’ve made the right decision! »
However…
There is still a key detail to settle … it’s a crucial detail in fact: which location(s) should you go to if you are a novice in street photography and you don’t quite yet have the confidence of Henri Cartier Bresson to immortalize scenes from daily life or portraits of strangers on your lens, but you still want to give it a go and see what happens?
Good news, because that’s just what we’re going to cover today, and you’ll find out there is a range of choices!
Because there isn’t 1, there isn’t 2, no in fact there are 3 places waiting for you nearby to get out and practice the joys of street photography on the fly where you can see other people through your camera while (almost) not being seen by your subjects.
You’ll notice that I said nearby and not where you are because after reflection, paradoxically, the process is easier when you avoid places where you go regularly.
Meanwhile, if you’re an old hand, don’t ask yourself too many questions. Just go for it!
Location number 1: URBAN TRANSPORT LINES AND STATIONS (stations, trains, subways, buses, tramways, airports, etc.)
The first rule to see without being seen is to place yourself in a location where:
- there are lots of passersby with very different profiles and appearances (so they’re very interesting)
- where the people are so busy as they’re passing by that they pay very little attention to you (you melt into the masses and they don’t even notice you there)
The good news is that stations and public transportation fulfill all these conditions.
Have you noticed the speed with which a Parisian with his Metro Pass moves through the network across the greater Paris transport system?
For anyone who doesn’t know what I’m talking about, I really discourage you strongly from getting in the way of a commuter train passenger at rush hour when he’s hurrying not to miss his connection… (people get knocked down and trampled for lesser offenses).
Now, get yourself into position.
So there you are in a metro car (for example): have a seat and wait, have a look around at the other people who enter the train, and people who are leaving…then at the moment you feel is right, or when something happens you like, click-click and go for it!

Careful!!! After you’ve taken your picture, don’t run out of the train as if you had just stolen the purse from the poor little old lady next to you: behave as naturally as you can, as if you had just photographed something from the window, or a simple poster on the wall (more or less, take your inspiration from Bill Clinton, who with the innocent face of an angel is able to look right into the camera and affirm that he had not had relations with a young lady by the name of Monica Lewinsky).
Another possible trick which also applies to urban transportation and stations: step into the crowd of travelers who walk speedily toward their connection on the platform, walk at a similar pace in this sea of passengers with your camera in hand, ready to shoot (adjust your settings in advance and increase your ISO if the passage is dark) and when you see an interesting person or situation, click-click, off you go !

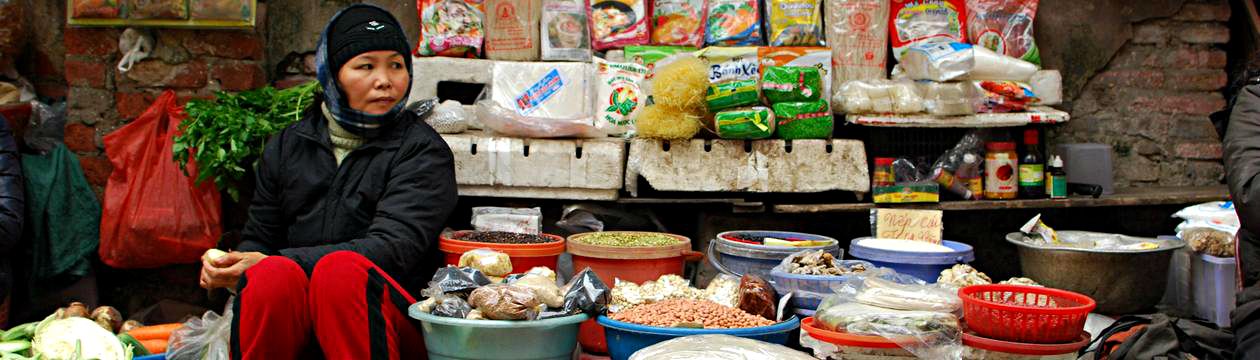
Place number 2: THE MARKET
The market is one of my favorite places for street photography, whether I’m home or abroad!
Why the market?
- Because there are so many people of all ages and every style (once again)
- Because people are interacting: vendors are unloading their wares, onlookers talk over the affairs of the day, foodies chat with farmers about the best cooking method for such and such asparagus or such and such specialty meat….
- Because you can find them anywhere (in every city and sometimes in every neighborhood)
- Because they are full of color, smells, and lively atmosphere
- And because you can also do your shopping while you’re out taking pictures (you kill 2 birds with 1 stone)
The trick for street photography in the marketplace” I am about to reveal is so simple and makes for such successful pictures that you’re going to say to yourself: “For heaven’s sake! Why don’t they write these kinds of common sense tips more often on the Internet! “Luckily, we’ve got your needs in mind (by the way, feel free to share this article with your photographer friends).
The most faithful readers will recall that we already brought this trick up in our tutorial from last week.
You can put this extremely simple trick to work for you in 3 stages:
- Stand in front of a vendor’s stall that you find captivating
- Set up your shot: find the best frame looking through your viewfinder, move off to the left or to the right as needed, and then move up or back a bit if necessary
- Once your frame is ready, wait for someone to arrive or for something to happen there and just then, click-click, go for it!


Location number 3: TOURIST SITES
Third and final place in our series “that anyone can go to for sensational results ” (that’s right, in addition to the other 2, we have found a third place for you to try): tourist sites!
From a visit to the Eiffel Tower to the discovery of the abbey around the corner, tourist sites have the advantage:
- of attracting people, lots of people
- of bringing together enormous numbers of people per square meter, and all of them with a camera, so the result is they’re not nervous rubbing elbows with other people who also have a camera in hand (do you follow me?)
And believe me, “The Sky is the Limit” (you’ll see for yourself): you can pretend to be a tourist and get very close, photograph people who are taking photographs (see what I mean?), aim and wait for a peal of laughter, have a ball among a group of visitors from around the world (like the famous photographer Martin Parr – while you remain modest, because let’s be realistic, we’re all tourists when we go to someone else’s country), …


So, here we are at the end of today’s tutorial (rats! I had promised to try, but once again, I’ve gone over – by twice as much – the length of the article expected… it’s the fault of the Manfrotto Imagine More team. Naively they let me take to my keyboard without guessing that I am one of the most wordy of all photography bloggers out there…).
Still, I hope you have enjoyed this tutorial and that you’ll forgive me for carrying on!
Final piece of advice before closing our “Street Photography” series: practice, practice, practice!
You become a sculptor by sculpting, and so you become a better photographer by taking pictures!
So take hundreds of pictures every week and you’re sure to get better.
And to reassure you, you should know that as for me, I only like 2 to 5% of my pictures (so when I take 200 shots, in the end there are only 5 to 10 photos I really like).
So for now, if you read this article on the train, put into action the first tip with your smartphone “Take pictures while you’re on public transport“!
Unless you prefer getting out in the early hours and going to the market to immortalize your local fishmonger speaking to the world, as usual, about the supremacy of Scottish salmon over Norwegian varieties?
Whatever you choose to do, we are eager to read your comments on the subject and see the photographs you take using these tips.
So we’ll see you soon!
PS : Yes, I’ll be back next week for a new tutorial…time will tell if I manage to keep my promise to write a shorter piece…
About the blogger
Maïeva Voyage is an amateur photographer who discovered photography completely by chance about 4 years ago when she was given a Reflex camera as a gift. It t changed her life.
She developed her photographic techniques especially in Vietnam through the Photo Club of Hanoi.
Since then she’s been endlessly nagging her friends and family to get them to pose for her and talking about photography, when she’s not sharing on her feminine Photo blog Photo-tuto.fr the secrets she’s learned from her friends and favorite photographers with a witty and decidedly relaxed tone (with already 300 articles in nearly 2 years of existence).
Maïeva Voyage is our invited author for the month of September, 2013.
You can also follow her on her Blog: www.photo-tuto.fr
Or on Facebook: www.facebook.com/Blog.Photo.Tuto.Fr
Or on Twitter: www.twitter.com/Photo_tuto_fr