


Blur is one of the most common problems that people experience when taking photos with the iPhone. However, once you understand the main causes of blur in your photos, it’s fairly easy to avoid taking blurry photos altogether. In this article you’re going to learn simple and effective techniques that will help you take shaper photos with your iPhone in any light conditions.

1. Set Focus on Your Subjects
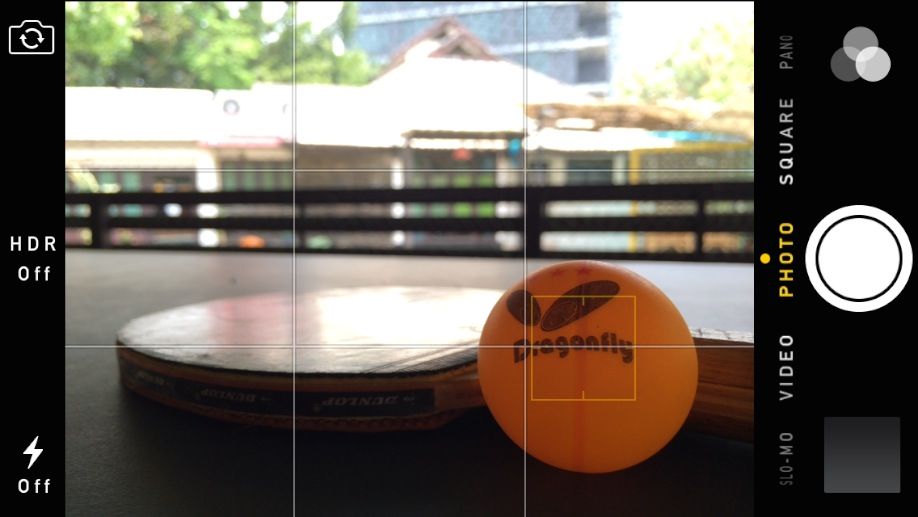
Poorly set focus is one of the most common reasons why your photos can end up blurry, and focus issues can affect photos in any light conditions. If you’re like most people, you probably rely on the autofocus to do the job for you, which performs well most of the time.
However, there are times when autofocus will let you down and you’re going to end up with something similar to the photo above. For best results you should set focus manually, which you can do simply by tapping the screen in the native Camera app on your iPhone.

In this example the iPhone has automatically set focus (and exposure) on the background of the photo, which is why the tennis ball in the foreground is out of focus while the background is in focus. If my goal was to capture the tennis ball, I would tap the screen on the ball to manually set focus (and exposure) on that spot as shown in the following example.
2. Shoot in Abundant Light
While it’s possible to take sharp photos with your iPhone at night, you’re generally going to get better results when there is more light in your photos. In low-light conditions (for example, when shooting indoors), less light reaches the camera sensor and the shutter has to stay open longer so that enough light can reach the sensor to create a properly exposed image.
Any movement that is captured while the shutter is open (including the movement of the iPhone itself as well as the movement of your subjects) will result in blur in your photos, and the longer the shutter stays open, the more movement (and thus more blur) there will be.
While the iPhone doesn’t let you adjust shutter speed manually, the shutter stays open for a shorter time when light is abundant. So if you can do anything to increase the amount of light in the photo (such as going outside or turning on the lights), you’re going to get sharper photos.

3. Stabilize Your Hands
Of course, it’s not always possible to increase the amount of light in the scene, and that’s when you should try to keep your iPhone as steady as possible while taking a photo. Make sure you hold your iPhone firmly with both hands and that your hands are supported against something.
Any external structures such as a table or a railing can be used to support your wrists or elbows, or you can even support your entire body against a wall. You can also try supporting your arms on your knees or your elbows against your waist when external support is not available.
Of course, you’re also going get much better results if you don’t rush your photos. Take some time make sure your photo is framed perfectly and your body is positioned comfortably while holding the iPhone steady, which will help you avoid any unnecessary movement.

4. Use a Steady Tripod
While it’s possible to keep your iPhone somewhat steady without any equipment, using a quality tripod is the best way to eliminate any movement (and thus blur) from your photos. Of course, carrying around a tripod takes some spontaneity away from your photos, but it also allows you to get amazing results, especially when taking landscape and long exposure photos.
While any tripod can be used with the iPhone, I recommend getting a serious tripod that will keep your iPhone steady even on wet surfaces or rocks. I use Manfrotto 190XPROB tripod with Manfrotto 804RC2 tripod head, but there are certainly other options.
You’ll also need a way to attach your iPhone to the tripod, and one easy way to do that is using this iPhone bumper from Manfrotto Klyp+ iPhone photography product line.

5. Take Photos With Your Headphones
One little-known iPhone photography trick is using the volume buttons on your headphones as a remote shutter release. Remember the white Apple headphones you got when you first bought your iPhone? It turns out that these headphones are very useful for iPhone photography.
With these headphones you can take photos by pressing the volume up and down buttons on the headphone wire. This is a great technique for reducing camera movement (both handheld and using a tripod) since you don’t even need to touch your iPhone to take a photo.

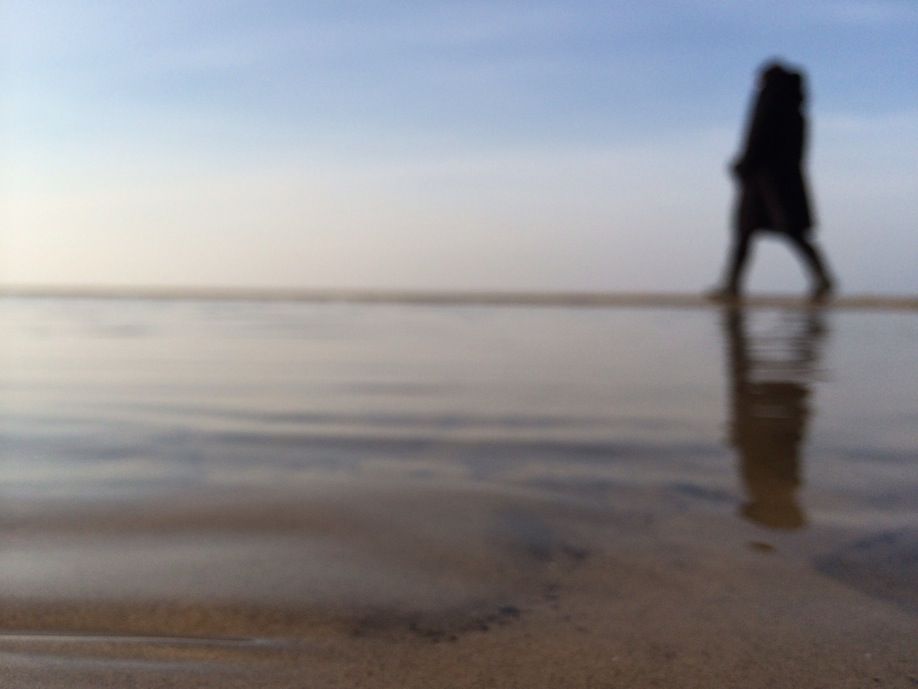
6. Avoid Moving Subjects
Besides keeping your iPhone as steady as possible, it’s also important that your subjects are not moving, especially when taking photos in low light. Even though the following photo didn’t work out as intended, it clearly shows what can happen when your subjects are moving.

In this example the subject on the left is almost entirely sharp while the subject on the right is blurred out. The only difference here is that the man on the left was standing still (except for his right arm) while the man on the right was quickly walking through the scene.
7. Increase Contrast in Post Processing
While the other tips in this article will help you actually take sharper photos, this tip allows you to cheat your way to sharp-looking iPhone photos through post-processing. It turns out that you can make your photos appear significantly sharper simply by increasing the contrast.
The reason why high-contrast photos appear sharper is that the lines separating the bright and the dark parts of the photo become more pronounced when contrast is increased, especially in black and white. Let me show you what I mean with an example.

The original photo that you can see above isn’t particularly sharp.

However, simply by increasing contrast and turning this photo into black and white I was able to create the impression of a very sharp photo, and people on Instagram pointed out how sharp this photo was even though it only looks sharp because of the high-contrast post processing.
Emil Pakarklis
About the author: Emil Pakarklis is the founder of iPhonePhotographySchool.com, a website about taking better photos with iPhone. If you want to improve your iPhone photos, visit iPhoneography 101, which is a resource Emil created for everyone who wants to start taking better photos with iPhone.