When I launched my cookery blog, my biggest problem was getting good photos. I’ve always been known, in my family, as the one who took awful photos on outings, with people with missing heads or feet, lopsided buildings, incomprehensible perspectives, blurred or dubious subjects.
Then, slowly but surely, by carefully observing photos taken by food bloggers and photographers that I admired, I came to understand what I was looking for and, over time, how to achieve it too.
Of course, taking a picture of a chocolate cake or a plate of tortellini is a lot easier than photographing a roast or the sauce for bird liver crostini. There are foods that photograph well, whose colours stand out and immediately make any photo look tasty; and there are foods that are more difficult to capture, that tend to lose their appeal in a photo. Soups are one of the toughest dishes to photograph.
However, it is not impossible to get a good shot; you just need to know a few tricks.
First of all, you need to distinguish among the three different types of soup, as does Andrew Scrivani, photographer for the food section in the New York Times.
There are soups that are beautiful in themselves, full of different ingredients, colours and textures. To the naked eye, they are immediately interesting, but through a camera lens, they don’t turn out so attractive. There is too much of everything; it’s impossible to focus your gaze on just one element.
In these such cases, the best suggestion is to go through it slowly, using food stylist tweezers or a spoon, and try to distribute all the ingredients uniformly. It’s a question of trial and error until you achieve a composition that is interesting and comes out well in a photo.
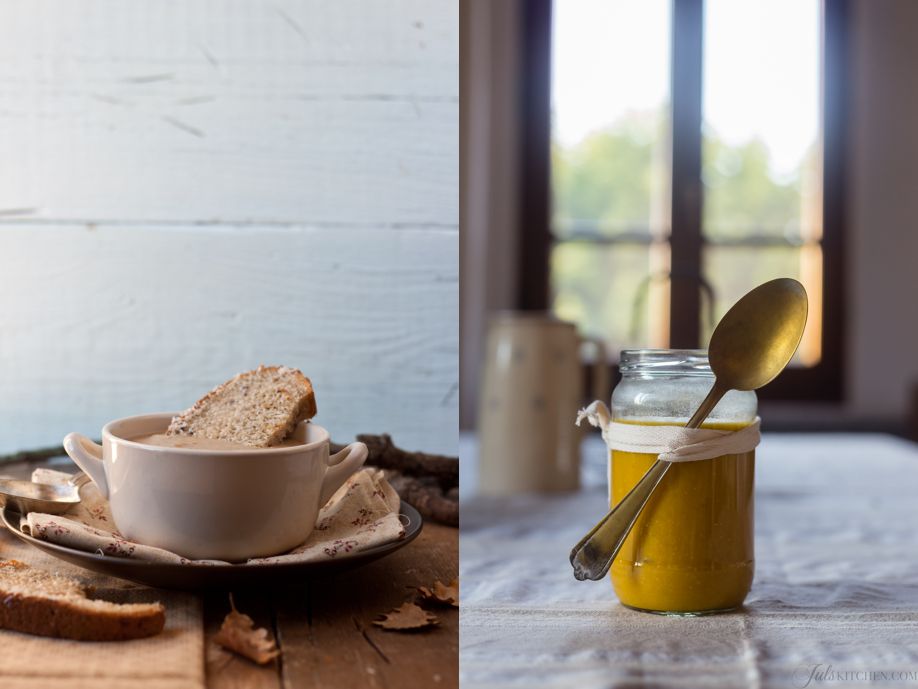
The second category involves monochromatic soups, those velvety smooth ones into which you instantly want to dip a spoon; a great winter comfort food. They can be hard to photograph but often guarantee the best results.
It is important to play around with garnishes and composition to create a graphic image: crostini, aromatic herbs, stir-fried vegetables, dry fruit, cream or yoghurt, toasted breadcrumbs. Even a drizzle of oil added at the last second or coarsely ground black pepper can make the surface of a monochromatic soup more interesting. You can also play around with colour contrasts, especially when you add cream or yoghurt to a soup: using a spoon, you can create spirals and weaves of colour.
Using additional ingredients on top of the soup can also serve to give you an idea of what it’s made of, as is the case with the artichoke puréed soup in the photo above on the right. Together with the bread and aromatic herbs, there are also bits of artichoke, an indication of the soup’s ingredients.
The third type of soup is the type in which all the ingredients are immersed in a liquid broth. In this case, the various components of the soup tend to float around sparsely or sink to the bottom of the dish. One of the tricks you can use is to remove some of the broth, as in the photo above, so that the ingredients stand out in the photo, and then you can also arrange them carefully, as done with the first category.
If the container you want to use is too deep, there’s always the trick of filling the bowl, or pan, with a smaller bowl placed upside-down, or with a few saucers, so that the ingredients float more easily. It is very important, in this case, to pay attention to how the light reflects on the soup’s surface, which will still be very liquid: you can shade it, change camera angle or play around with the reflections themselves.
If the soup you want to photograph is not particularly interesting or photogenic, you can always play around with the framing or with the type of props used in the photo. Remember that you must always tell a story, and the type of bowl you use, the spoons you choose and the final plating of the soup will all play a part in the mood of the photo.
Giulia Scarpaleggia
Giulia Scarpaleggia, teacher of Tuscan cookery courses for tourists, Tuscan food blogger, writer and photographer, 34 years old, from Colle Val d’Elsa (Siena).
I started my blog in February 2009. In January 2012, I began working full-time as a food blogger and teacher of cookery courses.
In December 2012, my first book ‘I Love Toscana’ was published by Food Editore in Italian and English.
In September 2013, I won the Macchianera Food Award for best Italian food blogger.
In September 2014, my second book, ‘Cucina da Chef con ingredienti low cost’ (Chef Cooking with Low Cost Ingredients) was published by BUR.
Blog: www.julskitchen.com
Twitter: @JulsKitchen
Facebook: Juls’ Kitchen
Pinterest: Juls’ Kitchen
Instagram: JulsKitchen


