

UK local hero Jacob James is a young and talented travel photographer who will be sharing with you a series of 8 weekly articles entitled ‘An Introduction to Photography’ – in this fifth article Jacob SHARES Ten Basic Steps to good lighting.
The word photography is derived from the two Greek words φωτός (phōtos) which loosely translates as ‘light’ and γραφή (graphé) which loosely translates as ‘to draw’.
Photography or ‘drawing with light’ is in its simplest terms the art of capturing light – learning how to control the light is therefore essential to creating great images. Whether you use available light, lighting equipment, or a combination of both to shape light using light modifiers, think about the following aspects as you “draw with light”.
1. Relative Size – The softness of light is controlled by its relative size. The bigger the relative size of a light source the softer the light. This property of light is what causes a huge light source such as the sun to create harsh shadows at midday.
2. Light Source Distance – The distance of your light source away from your subject is intrinsically linked with the relative size of your light source. The further a light source moves away from the subject the smaller its relative size.
3. Diffusion – Diffusion will cause the light to be spread wider, increase the light source’s relative size and therefore give softer light. Try using light diffusers to soften light in your photographs
4. Bouncing Light – A simple trick to increase the relative light source size is to bounce a smaller sized light source such as a flash into the ceiling above. This then converts the ceiling into your light source and therefore greatly increases its relative size. Make sure that the ceiling is a neutral colour however or you could end up with some crazy results!

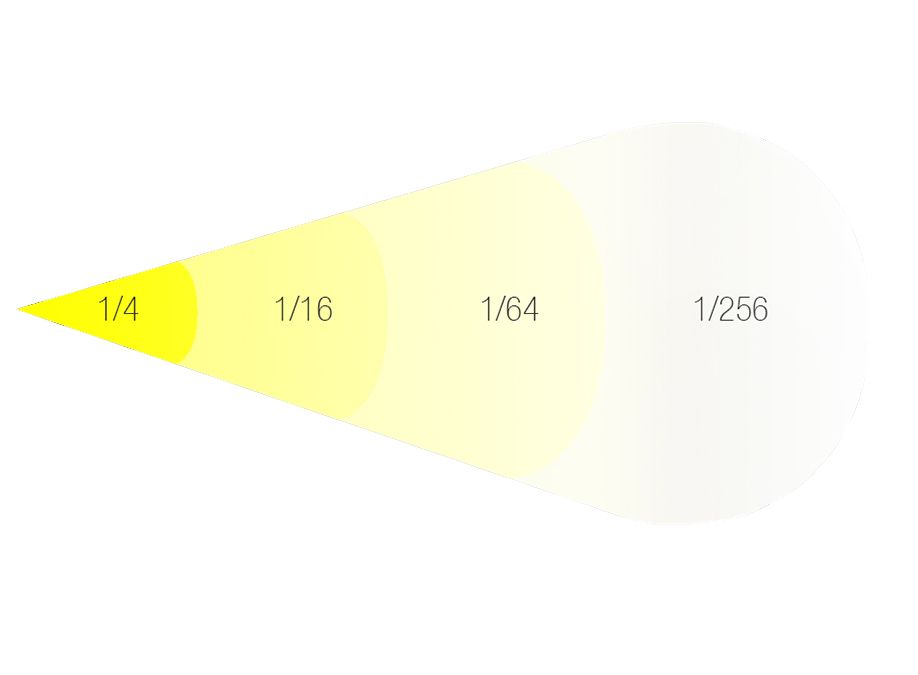
5. Fall off – The rate in which light falls off is not linear. As you double the distance away from the light source you divide the intensity of the light source by 4. Therefore the closer to the light source your subject is the greater the fall off. This is important to remember if you are shooting a group of people as you will want the lighting to remain as equal as possible over the entire group.
6. Lighting Angle – The angle of your light to your subject controls the depth of the shadows on your subjects and therefore controls texture. Placing your light directly in front of your subject will remove texture whereas placing it at 90 degrees will greatly emphasise it. A good starting point is around 45 degrees between yourself and your subject.

7. Shadows – Don’t be afraid of shadows. When used correctly shadows give your subject depth rather than just rendering them as a flat surface. This is often used for highly structured faces to emphasis this characteristic.
8. Time – The position of the sun in the sky controls how hard the natural light is. Shooting during the early and late hours of the day close to sunset and sunrise will give much softer light and allow you to shoot outside without the typical unflattering shadows of midday.
9. Colour – The colour of your light is also important. Throughout the day the colour temperature varies and tends to be warmer ‘golden light’ closer to sunrise and sunset. If you wish to add artificial light to the scene consider using coloured gels to replicate the natural light.
10. Reflector – The cheapest and simplest way to add control to your lighting. A reflector can be used to soften shadows or bounce light onto your subject from a stronger light source.
Please post your feedback, questions and views on this article or related topics and we will do our very best to answer them for you!
Look out for Jacob’s next article in the 8-part series: ‘Natural Light: What time of the day to shoot’.
For more information visit Jacob’s blog at: http://jacobjamesphotography.co.uk or Twitter: @JacobJamesPhoto