
I’m usually the first person to put my hand up and tell you that I’m not the world’s best photographer. In fact I’ve had more than one pro photographer confused as to how I get as much work as I do. In a nutshell, I’m not a photographer. I’m a marketer and a businesswoman and I use photography to do my job.
Despite the above I do know my way around a camera, I’ve made it my business to learn the technicalities of it all so that I have more options open to me when I’m shooting a tricky scene. I’d love to walk you through a recent job that I did in Alberta Canada and some of the challenges I faced. I hope that my explanations and images help you to learn a little bit about your own camera.

Sunwapta Falls, Alberta Canada
I’ll start with daytime long exposure because that’s a subject that I’m asked about regularly. Many new photographers want to start shooting with slower shutter speeds immediately and head out in broad daylight to do so. Usually the photos come back pure white and that comes down to the sheer amount of ambient light that’s around during the day. Slow shutter speed work needs one of two things – 1) A low light environment, think night time, dusk, dawn and particularly cloudy days OR 2) Dark filters known as neutral density filters that photographers fix over their lenses to block the amount of light coming in.
A few other pieces of equipment you will need are a sturdy tripod and a remote control for your camera. I use a variety of filters, neutral density filters at different strengths, graduated neutral density filters that are dark glass on half the filter and regular glass on the other half (for evening out your exposure when the sky is bright and the foreground is dark) and I always have a good polarizer filter on hand as well.

Athabasca Falls, Alberta Canada
When I am out on a job I am usually contracted to post four Instagram uploads a day. Ideally these would all be amazing images but in reality I have no control over my location or the weather so I need to be able to come back with shots regardless of the conditions. This means I’m scouting and shooting at all times of the day and not always in those amazing golden hours around sunrise and sunset.
Alberta is an easy gig because the location is so naturally beautiful but I did visit two waterfalls right in the middle of the day and I wanted to be able to show them off even though the light wasn’t ideal. Waterfalls look beautiful when you can slow the shutter speed down to a half or a quarter of a second right up to a few seconds as this creates that lovely soft water effect.

Banff Mountains, Alberta Canada
In both my Athabasca Falls and Sunwapta Falls photographs I used my Lee filters to block the light sufficiently to slow that shutter speed. I also used a variable neutral density filter positioned over the sky and a polarizer filter as well. The settings I used were – Athabasca: ISO 100, f 11, 1.6 seconds with a three stop grad, polarizer and 4 stop ND and Sunwapta Falls: ISO 50, f 16, ¼ seconds with the same filter combination. I used my Manfrotto tripod and a ball head plus a remote control attached to my camera. Using filters enabled me to walk away with a shot that looked a little dreamier than I would have achieved using a point and shoot or an automatic mode.
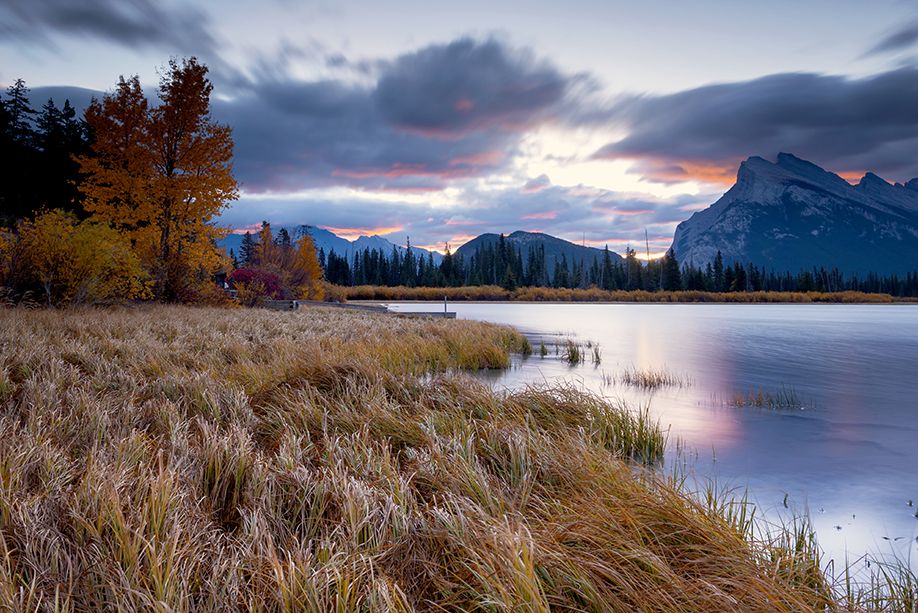
Lake Grasses, Alberta Canada
One aspect of shooting in Alberta that can be really tricky is definitely photographing a sunrise in the mountains. If you consider how dark a mountain range is and how bright the sky is when the sun comes up you can probably imagine how difficult it is to get the correct exposure in that scenario. If you expose for the mountains your sky will come out white and if you expose for the sky you will end up with black mountains. Without resorting to image stacking and HDR there are ways to get the shot using manual mode and graduated neutral density filters.

Fairmont Lake Louise, Alberta Canada
In my two Banff photographs I had to rely on stacked graduated filters over the sky and manual mode to make an exposure that worked. What I did was flick my camera into M, select ISO 100 and an aperture that made sense for the landscape. (f 11- f 16 is my preferred range for landscape photography) and then I basically played around with my shutter speed until I could see on my histogram that neither the shadows or highlights had clipped.
Relying on the histogram can be a real matter of trust because on my camera’s playback the mountains looked pure black! However I knew that these shadows could be recovered in Photoshop and my images came out okay, not my best work but certainly you can see all the detail in both the sky and the mountains. My settings were – Lake Grasses: ISO 100, f 11 and 20 seconds with two stacked three stop graduated ND’s and Banff Mountain: ISO 100, f 16 and 1/10 seconds.
Fairmont Lake Louise Detail Shot, Alberta Canada
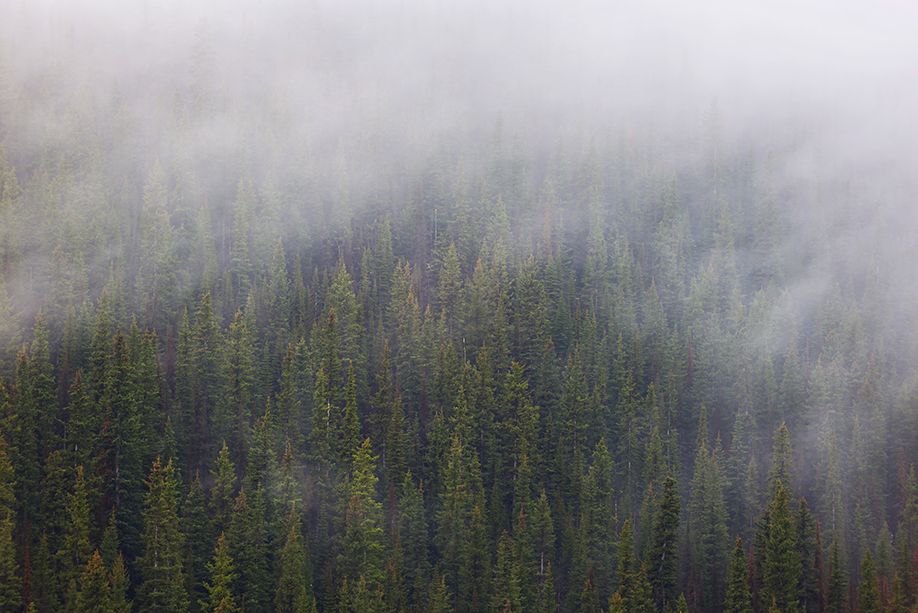
During my travels in Alberta I also had the rare privilege of access to the penthouse of the Fairmont Chateau Lake Louise where I was able to shoot the scene from an entirely different perspective to most visitors. Spotting the obvious composition I snapped a shot of the Lake House with those classic blue waters, reflection and tree line. I’m sure that every other photographer on the balcony had exactly the same photo. Because I wanted to do something different I started to think about what it was that made the scene beautiful to me and started breaking it down.

Reflection shot, too messy! Alberta Canada
I eventually decided I wanted a photograph of the fog over the trees, something unique. I switched over to my 70-200 telephoto lens and started isolating the trees. Since what I was photographing was quite dark I used my exposure compensation to slightly underexpose in aperture priority mode. This counteracts the cameras proclivity to over expose in such lighting. The work was not hand held so I could afford to keep the ISO at 100 and the aperture at f11. My shutter speed came out at 1/13 seconds and I loved what I walked away with.

Bridge, why? Alberta Canada
My final example for you is more about preparedness and keeping your cool! My group had decided to hit the road early traveling from Lake Louise to Jasper so that we could make a sunrise at Bow Lake. It had been snowing a little and the sky throughout the trip hadn’t really done anything spectacular. To say I was unprepared for sunrise is an understatement. Yet, despite all odds we pulled up in the car park just as the sky turned fairy floss pink. With mist and fog sweeping across the lake and every shade of pastel pink you can imagine the scene I was faced with was nothing short of magical. Did I keep my cool or did I run around like a fool capturing many beautiful but average shots? Haha.
I took all the obvious choices; a reflection in a puddle (too messy), a small walk bridge (why? There was nothing interesting in the comp at all), a side view of the lake (better, although I didn’t spot the person right in the middle of my composition) and finally a very wide angle shot that I think does the scene a little more justice.

How did he get in there? Alberta Canada
Even with my experience I still lose it when the light is incredible and I guess that’s a lesson to all of us. Know your equipment like the back of your hand, know exactly where in your bag you can lay your hands on things (filters, lenses, remotes) and try to remember basic composition when faced with the most beautiful thing you’ve ever seen! My settings in this series of shots were quite similar. ISO 100, f 16 and shutter speeds varying between 1 and 3 seconds as the light changed. Obviously I was using a tripod and the two lenses I had out were my 14-24 and 24-70.

Better, Alberta Canada
So that was a pretty long post but it’s a pretty wide subject. No amount of reading articles on the Internet is going to make you a better photographer, you need to get out there and do it! Make yourself a bunch of white images and learn from your mistakes. Invest in the tripods and filters and accessories that you need to take your photography to the next level and remember that we all started somewhere. Happy shooting!
Lauren Bath
Instagram: @laurenepbath
Facebook: www.facebook.com/LaurenBathServices